Saturday, October 24, 2015

Flexible Terrain Mat part II

Well today was the day to attempt the full size terrain mat.  On Thursday I did a smaller 4'x4' mat to try out a few other things that I learned or others had suggested from my first attempt.  This time instead of clamping the canvas down to the wood itself, I had two 8' 1x3 pieces of wood cut in half.  Using the canvas that over lapped the table I clamped those pieces of wood to the canvas giving me the full surface to work on.  However the practice canvas I did on Thursday shrunk significantly, almost 3/4".  So today I still clamped the boards to the canvas but I then drove some wood screws with washers into the edges of the plywood table to hold the canvas as well.  The clamped boards helped in pulling out the wrinkles and screws then helped in holding it into place. 
Now the other thing I tried differently was the mixing of the caulking, sand and paint mixture.  I stopped at our local Fred Meyer (grocery store) and picked up an $8 hand mixer.  I poured the paint, sand and caulk into my bucket and then used the mixer.  It worked great!  It cut my mixing time in half.  Unlike my first time I didn't put in any water just to see how thick the mixture was and it was pretty thick.  I used about a 1/2 cup of water and blended that into it.  That helped a great deal.
So my mixture contained
4 tubes of acrylic painters caulk
1/2 gallon of latex paint
1/2 cup of water
enough sand to cover the bottom of the bucket.  You don't need a lot of sand for this, goes far when mixing with paint.  
This amount covered a 4'x8' mat with nothing left over in the bucket.


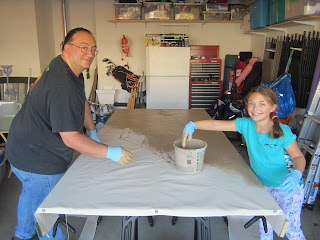
 Today I also had some help from my lovely assistant Charlotte, who's my daughter.
The first time she stuck her hand in the bucket she freaked and said, "Daddy my glove has a hole in it.  I can feel the paint!"  I told her she didn't but what she was feeling was the cool temperature of the paint.  Soon she was smearing the stuff around like a champ!


My wife came out and took some pictures of us.  This process went very quickly.

The mixture has been applied.  You will notice that the edges were also painted.  So when the canvas shrinks the color will go right to the edge.


My daughter sifting the flocking over the paint.  Using a big metal spoon I picked from Goodwill and a strainer the flocking comes out nice and smooth. No large clumps at all.


The finished product.  I didn't take a picture of it but the closest edge had already shrunk some from the paint.  I'm glad I tacked it down with the screws and washers.  It will now sit over night and tomorrow night or Monday night I will hit it with some Woodland Scenics' Scenic Cement.
This mat will make it's gaming debut on 11/7.  Can't wait!
Monday, October 12, 2015

Flexible Terrain Mat

Well I finally did it. I made my own flexible terrain mat.  Some of you have read Tobi's blog post on making a  Flexible Terrain Mat.  If you haven't it's worth the trip over there.  I've had the canvas and some of the materials for about 6 months or so, I was lacking time and space in the garage to set this up and do it.  I was inspired by Tobi's mat to try my own but the only thing about his post was the lack of details on HOW he did it.  For example he doesn't specify how much water he mixed into the sand and paint.  
So to give this a whirl I bought a small piece of artist canvas and the supplies and decided to take the plunge.


The bare white canvas. Tobi drilled screws or something like that into his table to hold the canvas down and to stop it from shrinking.  First time out I just used some clamps to hold it place.  The work space is 4'x4'.

I stopped by the local Ace Hardware and picked up 50lbs of Play ground sand for $5.  Again no real proportions were given so I just poured some in remembering my scenery building days from theatre and a little bit of sand goes a long way. 

The acrylic latex caulk.  Inexpensive ones.  I did notice that some of the caulk had silicon in it so I avoided that type.

The paint! Again at the local Ace they had these quart sized cans that had been returned and my 9 yr old daughter helped me pick out two different colors we thought would work out.

The rest of the supplies. Gloves (very needed), water, underbrush foliage, static grass and fine turf.  Also a strainer and a pencil which you can't see.

The two buckets of paint, sand and caulk and water.  I used all three tubes of caulk about 1 1/2 in each bucket. I poured in the water and then realized I had too much water. What should have turned out to be a paste like substance was more like a thick soup. I added a little more paint to the mix.  I put on the gloves and mixed it all together. This took the longest amount of time.  The caulk does not break up easily in paint, sand, water mixture.  I'm thinking for the next one I will pick up an used hand held mixer at Goodwill and use that instead.


So I smeared the mixture onto the canvas.  The darker color was a lot more runny and I feared it wouldn't work.  I was also unsure how smooth the mixture should be on the canvas. I tried a few times to smooth it out but it only made it worse. Again all of this was applied by hand. No brushes or putty knives etc..

Now the flocking. Note to anyone who decides to do this. When opening up one of Woodland Scenics big bottles of Fine Turf, make sure you have opened up the shaker side first before you turn the thing over.  See that big dark patch, yep the spoon side was open. Oh well as Bob Ross would say, "A happy accident".


These three pictures show the different colors of static grass I used and the little bit of clump foliage.  To apply this I dumped some of the grass into my strainer and then used the pencil to stir it out so it would clump up and would fall where it wanted too.  It worked really well.

So I let this dry for 24 hours.  The following day after work I grabbed my bottle of Woodland Scenics Scenic Cement with the spray top and sprayed down the whole mat.

Again another 24 hours rolled along and when I got home from work everything was nice and dry.  I took the clamps off and there was very little shrinkage of the canvas.  I picked up one side to see how much flocking would come off and the barest amount fell off.  So far so good.  

I trimmed the excess canvas off of the sides and then asked my wife and daughter to come and give their opinion.  Essentially I wasn't sure which colored side I liked better.  I'm leaning towards the lighter side.  My daughter liked the lighter side but wife liked the darker side.

Which side do you like? I asking this seriously so when I do the larger 8'x4' canvas I will get only one color this time. I don't think I should go darker as it would hide the flocking but I could be wrong. Might need to do another test piece. 

When I was all done, I rolled the thing up and unrolled it and nothing fell off.

I learned a few things with this piece. 
1. less water!! 
2. need something else to mix it all together with.
3. For the bigger canvas, bolting it down will be better than the clamps. They took up too much room.
4. Instead of applying the static grass in separate waves blend them all and then sprinkle it on.  Will give a better more realistic look. 

Saturday, October 10, 2015

Dave's Baggage Train

When I went to Historicon this past summer I ran across Dave's Baggage Train. Owned by Phillip.  Dave's Baggage Train
The first thing I noticed about these trays was the nice plastic they were made out of and how the trays are durable.  I have plenty of the Army Transport trays made from foam and most of them have come apart at the seams. Literally.  
There are several types of trays, the ones I bought were 2" deep and plastic. He also has some made of wood.  
The other nice thing is the price point. Dave's trays are $6 a piece (for the 2" ones) compared to the $11 or $12 Army transport trays.


Here's a shot of the army transport tray inside the Dave's Baggage Train tray.  The length of the tray means you can't use the army transport bags.  Since I've invested a lot of money in the army transport trays I will keep using them to store my figures but use the Baggage train trays for transport.

These are 1/72 scale tanks in the 2" tray.  There are other accessories you can purchase as well like tray liners, magnet sheets and so on.

Give them a look and see what you think.   

Sunday, October 4, 2015

HAPPY ANNIVERSARY!!!!!


THANK YOU ALL FOR YOUR INTEREST IN MY LITTLE CORNER OF THE WEB.  

SOME STATS:
FIRST POST 10/4/10
121 POSTS
76,878 PAGE VIEWS
75 FOLLOWERS

I am hoping to publish more on this blog for this coming year. Stay tuned!