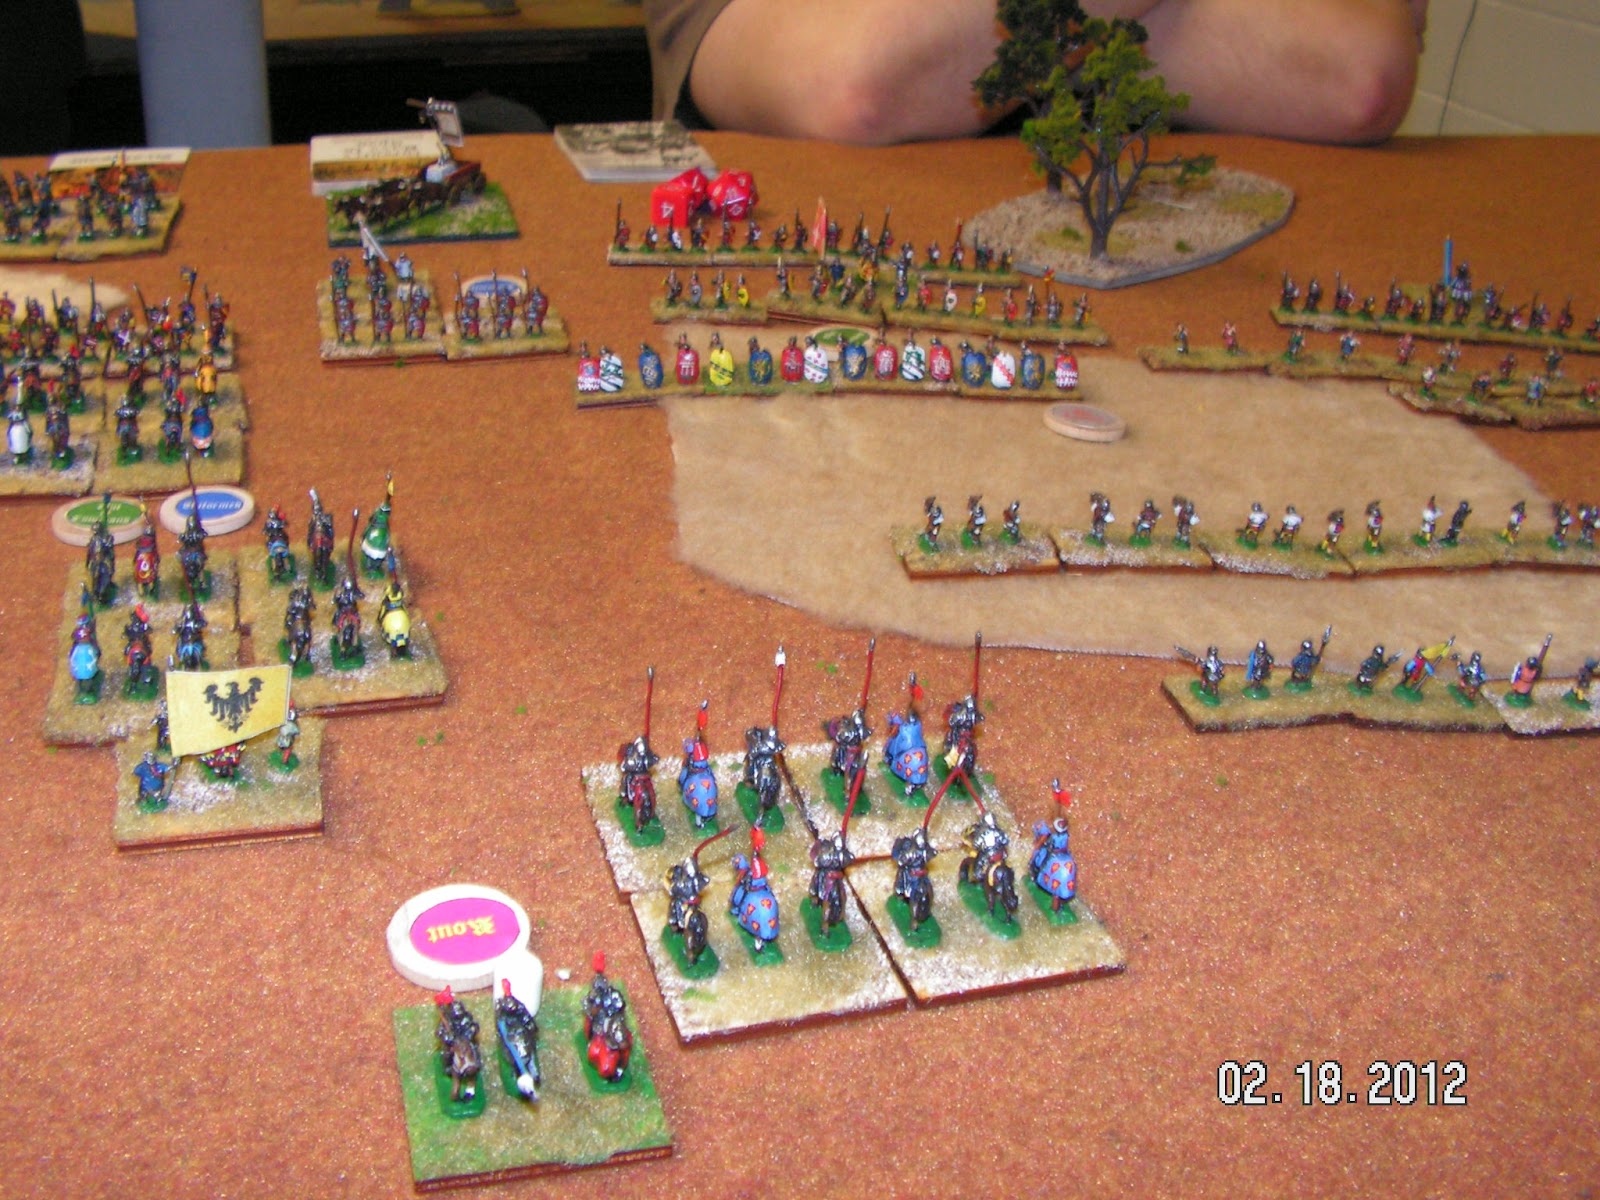
It was a warm summer day with a gentle breeze rushing over the fields. The Pope and his army readied themselves to meet the Holy Roman Emperor in battle. This fight between the two most powerful men in the world had been brewing for some time. Insults were traded, assignation attempts foiled and the confiscation of land brought these two armies together. The time had come for the words to cease and swords would carry the day.
The area picked for the battle was open with only wheat fields and small groupings of trees. There were small rises that gave one a better vantage point but neither commander established themselves there. They both chose to lead their armies into battle.
The Pope placed his commanders on his flanks, while his Holiness held the center with his scared emblem situated so all could see it.
The Holy Roman Emperor matched the Pope's disposition and steadily advanced across the fields, while the Pope waited.
On the Holy Roman Emporer's left his forces came under heavy crossbow fire and their advance stalled as the Emporer's general attempted to reestablish order and push his men onward.
On the Emporer's right his General pushed his men along, though he too faltered under heavy bow and crossbow fire. Several times the General pushed, threatened, pleaded with his men to keep moving and to advance upon the enemy but his men held their place and waited.
Undeterred by the failing advance of his left and right, the Emperor himself pushed his knights forward. Up the center of the battlefield they rode smashing into the infantry arrayed out in front of them. In what could only be described as divine providence, the infantry held their ground and the knights routed away, unable to return that day. Still feeling empowered, the Holy Roman Emperor charged home with his own guard of Knights. This action spurred the Pope in action as he too led his own troops to meet the on coming charge.
The battle that ensued with both commanders leading their men on to victory turned into a bloody day for the Pope and his army. No one is sure which knight struck the first blow to the Pope but his men seeing him fall from his war horse, broke and ran leaving the Pope dying on the field. News quickly swept across the battle of the Pope's demise and the rest of the Papal army disintegrated into mobs of men and horses trying to escape death or capture.
Exhausted the Holy Roman Emperor halted his army and did not pursue as his center force was also licking its wounds from the hard won battle. The Emperor decided to march on Rome another day.
This chronicle was written by Giovanni Ugurieri, a noble in the Papal army.
This battle used Piquet's Band of Brothers 2. We fought the battle in roughly 4 hours. An interesting thing about this battle was that the Papal army looked like it was on the verge of routing the HRE's army at one point. Bad die rolls had caused some issues for the HRE but in a complete reversal of fortune the tide shifted with the death of the Pope. While a major victory for the HRE in killing the Pope, the HRE's army was badly beaten up and a few units killed to the man. Ultimately, I as the umpire called the game a tie. We had a lot of fun with this one.
Welcome to my wargaming blog. Within these pages I will chronicle the exploits of our little Portland, Oregon wargaming group. Our interests flow from medieval to modern gaming. I hope you enjoy our little corner of this wonderful hobby.
Wednesday, February 29, 2012
Friday, January 27, 2012
Plastic Soldier Company's Allied M4A2 Sherman Tank
Recently I purchased for the first time a kit from Plastic Soldier Company. I picked up their Sherman Tank box. There are 5 tanks in the box for $30.00 which isn't a bad price for 5 tanks.
Each tank and all of it pieces and variations come on one sprue. Each model has the possibility of being three different tanks. A 75mm Thin Mantlet, 75mm Wide Mantlet and a 76mm Cast Drive Cover.
I decided to make the 75mm Wide Mantlet version. After taking all of the pieces off that I needed, I should point out that the only instructions are one page, front and back. The different versions are color coded with a picture of what they look like on one side and an exploded view of the pieces coming together.
Everything goes together by visual representation, also there aren't any reference numbers to correspond the different variations to one model type.
While building it I did have some issues with the tracks and the fenders. The tracks come in two pieces and they require one to put the top part of the track on the chassis wheels first and then mount the chassis to the tank. This prevents the track from falling off while waiting for the glue to dry. Once that dried putting the bottom part of the track on required some fiddling as the track does not fit snuggly up against the road wheels. Also the two tracks do not touch when applied.
This will require adding some green stuff or some other filler to close the gaps.
The fenders do not have any guides or notches to place them against to ensure a proper fit. So arranging the fender so it was level proved tricky. I did a number of dry runs before adding the glue. I'm not happy with the way it went together since it left gaps on the front.
Overall the model went together quickly. I do think that it would be easier to have had rubber tracks in the kit or pre-molded tracks all ready applied to the chassis wheels.
Here are some photos of the completed model. It has not been painted as I'm waiting to finish all 5.
Each tank and all of it pieces and variations come on one sprue. Each model has the possibility of being three different tanks. A 75mm Thin Mantlet, 75mm Wide Mantlet and a 76mm Cast Drive Cover.
I decided to make the 75mm Wide Mantlet version. After taking all of the pieces off that I needed, I should point out that the only instructions are one page, front and back. The different versions are color coded with a picture of what they look like on one side and an exploded view of the pieces coming together.
Everything goes together by visual representation, also there aren't any reference numbers to correspond the different variations to one model type.
While building it I did have some issues with the tracks and the fenders. The tracks come in two pieces and they require one to put the top part of the track on the chassis wheels first and then mount the chassis to the tank. This prevents the track from falling off while waiting for the glue to dry. Once that dried putting the bottom part of the track on required some fiddling as the track does not fit snuggly up against the road wheels. Also the two tracks do not touch when applied.
This will require adding some green stuff or some other filler to close the gaps.
The fenders do not have any guides or notches to place them against to ensure a proper fit. So arranging the fender so it was level proved tricky. I did a number of dry runs before adding the glue. I'm not happy with the way it went together since it left gaps on the front.
Overall the model went together quickly. I do think that it would be easier to have had rubber tracks in the kit or pre-molded tracks all ready applied to the chassis wheels.
Here are some photos of the completed model. It has not been painted as I'm waiting to finish all 5.
Thursday, January 26, 2012
Ritirata! Inferno! (Retreat! Hell!) Sicily July 12th 1943
This past Saturday my gaming group and I got together to play a WWII battle that I came up with using the Too Fat Lardies new "I Ain't Been Shot Mum" 3rd edition. This particular scenario came from my creative imagination and what I thought could have happened between the Italians and Germans if they had cooperated a little bit more during the invasion of Sicily.
The Italian commander was given the task of holding back the on rushing Americans with one Bersaglieri Platoon and 3 R35's and one Semovent 90/53. Throughout the game the Italians would receive some reinforcements in the form of one regular Italian Infantry platoon and two German rifle platoons.
The American commander had at his disposal 3 rifle platoons, 3 Shermans, 2 MMG and 3 60mm motars.
The Italians started dug in and opted not to use blinds for their concealment hoping it would slow the Americans down in trying to search them out.
This is the table setup before the American placement.
Despite the loss of a sherman, the Americans responded quickly immobilizing the Semovent and destroying an R35 sitting behind a wall.
Soon after the tanks fired the American infantry found the waiting Italian infantry in a grove of trees and a house.
In the most characteristic style the Americans threw everything they had at the Italians and after a few rounds of fire, the Italians lost their bottle and took off.
Out of a 12 turn game I had planned we finished 5 turns in 4 hours and we had to call the game because of time. The reinforcements had only started to come on by this point and had no effect on the battle. I want to set this one up again because I think it has the potential to be a hard fought battle for the Americans if they aren't careful.
The Italian commander was given the task of holding back the on rushing Americans with one Bersaglieri Platoon and 3 R35's and one Semovent 90/53. Throughout the game the Italians would receive some reinforcements in the form of one regular Italian Infantry platoon and two German rifle platoons.
The American commander had at his disposal 3 rifle platoons, 3 Shermans, 2 MMG and 3 60mm motars.
The Italians started dug in and opted not to use blinds for their concealment hoping it would slow the Americans down in trying to search them out.
This is the table setup before the American placement.
The Americans came onto the board covering a wide front and scouting for the enemy.
In an attempt to draw off some of the American forces the Italian commander released some his scouts.
The dug in Italians spotted a portion of the Americans and found the tanks almost immediately. The Italians would also draw first blood when the Semovent opened up and took out a sherman on the first shot.
Soon after the tanks fired the American infantry found the waiting Italian infantry in a grove of trees and a house.
In the most characteristic style the Americans threw everything they had at the Italians and after a few rounds of fire, the Italians lost their bottle and took off.
Out of a 12 turn game I had planned we finished 5 turns in 4 hours and we had to call the game because of time. The reinforcements had only started to come on by this point and had no effect on the battle. I want to set this one up again because I think it has the potential to be a hard fought battle for the Americans if they aren't careful.
Tuesday, January 17, 2012
Playing Favorites.....
A couple of blogs I follow Trouble At T'Mill and Mylardiesgames are carrying on a little game called Playing Favorites. As a war gamer you pick your favorite rules, figures, period and so on. I liked the idea and decided to follow along.....
To start off with the toughest of them all for us gamers....
Period
This is tough as there are many periods I like to game but two really stand out as the top one and two. World War I for its sheer size and the almost dogged way the armies held onto out dated tactics and ushered in a new era of warfare that changed the world forever.
The other is the American Revolution. There are far to many reasons as to why I like this period but one of them is because I grew up in NJ and lots of the battles and marches etc were all within driving distance for a young kid who loved history.
Scale
15mm fills the role of most of my armies, although I do have 10mm and some 20mm figures as well. This does not count my naval and air forces.
Rules
Piquet tops my list of my favorite set of rules. I use them to cover my interests in WWI and the AWI.
Board Game
Paths of Glory by GMT. This game has provided me and my friends countless hours of fun.
Figure Manufacturer
I love Pendraken figures. They are crisp and clean molds and they look fantastic before and after painting. In 15mm I like Peter Pig. Sometimes they can be a little chunky but the detail is excellent.
Opponent
This is easy my gaming group here in Portland, OR. We have been gaming together for nearly 12 years now. We are a diverse set of individuals and I am proud to call them my friends.
Inspiration: Film
The film, really its a series from HBO, the Band of Brothers. It is an outstanding piece of film that really captures the soldiers and their struggle to survive and function during WWII.
Inspiration: Book
Saratoga: The Turning Point of America's Revolutionary War by Richard Ketchum. This book really captures the feel of the period and brings together the two opposing forces in real detail.
Inspiration: Art
John Singer Sargent's painting "Gassed" from 1919
I hope you have enjoyed my favorites.
To start off with the toughest of them all for us gamers....
Period
This is tough as there are many periods I like to game but two really stand out as the top one and two. World War I for its sheer size and the almost dogged way the armies held onto out dated tactics and ushered in a new era of warfare that changed the world forever.
The other is the American Revolution. There are far to many reasons as to why I like this period but one of them is because I grew up in NJ and lots of the battles and marches etc were all within driving distance for a young kid who loved history.
Scale
15mm fills the role of most of my armies, although I do have 10mm and some 20mm figures as well. This does not count my naval and air forces.
Rules
Piquet tops my list of my favorite set of rules. I use them to cover my interests in WWI and the AWI.
Board Game
Paths of Glory by GMT. This game has provided me and my friends countless hours of fun.
Figure Manufacturer
I love Pendraken figures. They are crisp and clean molds and they look fantastic before and after painting. In 15mm I like Peter Pig. Sometimes they can be a little chunky but the detail is excellent.
Opponent
This is easy my gaming group here in Portland, OR. We have been gaming together for nearly 12 years now. We are a diverse set of individuals and I am proud to call them my friends.
Inspiration: Film
The film, really its a series from HBO, the Band of Brothers. It is an outstanding piece of film that really captures the soldiers and their struggle to survive and function during WWII.
Inspiration: Book
Saratoga: The Turning Point of America's Revolutionary War by Richard Ketchum. This book really captures the feel of the period and brings together the two opposing forces in real detail.
Inspiration: Art
John Singer Sargent's painting "Gassed" from 1919
I hope you have enjoyed my favorites.
Monday, January 16, 2012
Some great WWII Bomber Footage.
This is some great bomber footage on a raid into Japan. P-51's escort a B-29 flight on a bomber run. It's rather long around 30 minutes but well worth it.
The Last Bomb
The Last Bomb
Saturday, December 31, 2011
Saturday, December 24, 2011
A test battle using "This Very Ground"
In the search for a set of American Revolutionary War skirmish rules, I picked up the set "This Very Ground" by Iron Ivan. Even though the rule set was designed with the French and Indian War in mind but in my mind there isn't a whole lot of difference between the two conflicts. I'm sure I will catch some flack for this.
The rules themselves were very easy to comprehend after a couple of read throughs and what I read seemed to translate well to the table top. What I mean by this, is that the movement, firing and overall flow of the game went well with very few reasons to look up different things in the rule book.
Here are some photos from our game.
The British form up to take on the rebel militia.
The rebels spread out and use the trees as cover.
The rebels swarm out into the field.
More British use the road to swarm around the rebels flank.
The rebels try to answer the British flank attack.
A close up of the rebels.
The British line takes a casualty and returns fire.
The rebels hold their own in melee.
But the British keep up the pressure.
The rebels fall to the man in the bloody melee.
The rebels in the trees open up on the british causing the british to go disrupted.
More rebels fire at the oncoming British.
More volley fire from the British.
The British start to force their way into the fields.
A close up of the British.
More melee and rebels hold their own.
A few more British fall down dead.
The rebels seize the day with the British deciding to fall back due to heavy losses.
Over all our experience with Iron Ivan's game was very positive. We like the mechanics and the feel of the game as well. The system also allowed one to use period tactics which allowed the rebels to use cover and skirmishing to their advantage but when they came out in the open against the British line they took heavy losses.
We will be playing these again.
Subscribe to:
Posts (Atom)