Saturday, April 26, 2014

Built some new Forests.


 So a few years ago I built some forest bases for my games.  If you scroll through some of my past posts you will see what I had made.  Those were all first time attempts and I wasn't happy with them but I stuck with them until I figured out what and how I would redo them.  Well after searching the internet and finding lots of different opinions on how to build them and I found some great ideas. I had two requirements for this project.  The first was that the trees had to come off of the base for storage.  The second the bases had to be large enough for firing distances and for the troops in them to have some sort of visual spotting range once inside of them.  After looking through the rule sets that my group uses the most, I decided that base of the forest had to be at least 6" in depth.

The first thing I had to acquire was new trees.  With this I decided to build my own using Woodland Scenics trees and foliage. The Woodland Scenic trees have removable trunks so I went with them.  So after much trial and error, I came across a system that worked for me at least.  I purchased some glue called 9001 clear.  This stuff dried in a couple of hours.  Once that dried I then took some aquanet and sprayed the foliage to harden it up.  Once that was dry I worked on the bases.

For the bases, I borrowed an idea from another blog (who's name escapes me at the moment) and went to Home Depot and bought some self-adhesive flexible tiles.  They were about $1.50 a tile.  I bought 6 of them.  I also bought a roll of draw liner to stick to the back of the tile and to prevent them from slipping.  I then took some good scissors and cut out patterns of what the forests would look like.  I then glued down the tree bases to the forest base.


These photos show the trees on the forest base before I glued down the tree bases.
Once the tree bases had dried I applied some Liquitex Matte Gel and mixed it with Burnt Umber Acrylic Paint.  Using a painting knife I smeared the gel onto the forest base.  Ensuring I covered the tree bases.  Using some Woodland Scenics Fine Turf and Static Grass Flock in Harvest Gold and Light Green, I sprinkled it all over the bases.  I let that sit for 24 hours to dry.  I then sprayed the top of the bases with Woodland Scenics Scenic Cement.  That sat for another 24 hours to dry.  The finished base looked like this:


I then put the trees back into their bases for the finished product.  I added some 15mm pikemen to give a sense of scale for the pictures.


I'm rather happy with how they turned out.  I will be using them this weekend for the first time.  Hopefully they will stand up to the rigors of gaming.


Some new books arrived this week.

Some new books arrived this past week for my reading pleasure.  I thought I would share my new finds with you all.  
The first is Mussolini's Navy.  An excellent book on the Italian Navy during WWII.  I've always had a fascination with this navy.  This book gives an excellent overview of the navy and the ships and men who were a part of it. 


There are wonderful pictures of each class of ship.

Along with color photos.

And a wonderful guide to camouflage used by the navy.

My next little gem is on the Roman Army as you can see from the picture below it's about the complete Roman Army. This books cover every facet of the army from it's very beginning to the end.  Lots of photos and great diagrams.


The last book I picked up is Don Troiani's Soldiers of the American Revolution.  A great book of Don Troiani's paintings.  It's also a great reference also for my AWI project that I'm working on at the moment. 

This is one of the great illustrations in the book along with wonderful photos of equipment used by the people of the period.

Sunday, March 16, 2014

10mm Medieval Photos

Based on my last post a few people asked for some close up photos of my 10mm figures.   So here are a few photos of them.  Like I posted before all of these figures were painted by DJD Miniatures.  I really like how the Palvesari turned out. The shields are magnificent.


Wednesday, March 12, 2014

The Battle of Campaldino, 1289 Enfilade Setup

It's that time of year again.  Getting ready for Enfilade at the end of May.  This years theme is Obscure Theaters or Battles.  I have decided to run the Battle of Campaldino which featured the Guelfs vs. Ghibellines.  I figure this is obscure enough of a medieval battle to run and to enter into the contest for the theme. I love medieval Italy and all of the factions that fought all over that country.  It is a very interesting time period and I used it as my minor for my masters degree in history.

I have a board game called Guelfs vs. Ghibellines which I'm grabbing the terrain layout and order of battle.  Like most medieval battles this one was fought on a wide open plain with a slight rising hill on one side and three rivers making up the boarders of the plain.  An Abbey sits in one corner of the hill and a road runs along the base of the hill.  There are only a few clumps of small woods in the area as well.  At the moment I'm not sure if the plain was a farmed field or not.  Most of the information about the battle tends to focus on the combatants and not the terrain.  While the game board for the game itself is useful, having an actual description from someone there would be beneficial.

For this battle I will be using Piquet's Band of Brothers.  I will be using the domino method for the impetus pulls.  This way each side will have a chance of moving and it will lessen the big impetus swings that can happen with the dice.

Below is a picture of the Ghibelline army that will face off against the Guelfs.  All of the figures are 10mm and are from Pendraken.  They were painted by DJD Miniatures.

This is the Guelf army also 10mm and from Pendraken.  They were also painted by DJD Miniatures.

I am hoping to run a test battle in April with my group.  All I have to do now is make up the terrain and the battle rosters for both armies.

Thursday, January 30, 2014

A Franco-Prussian Battle

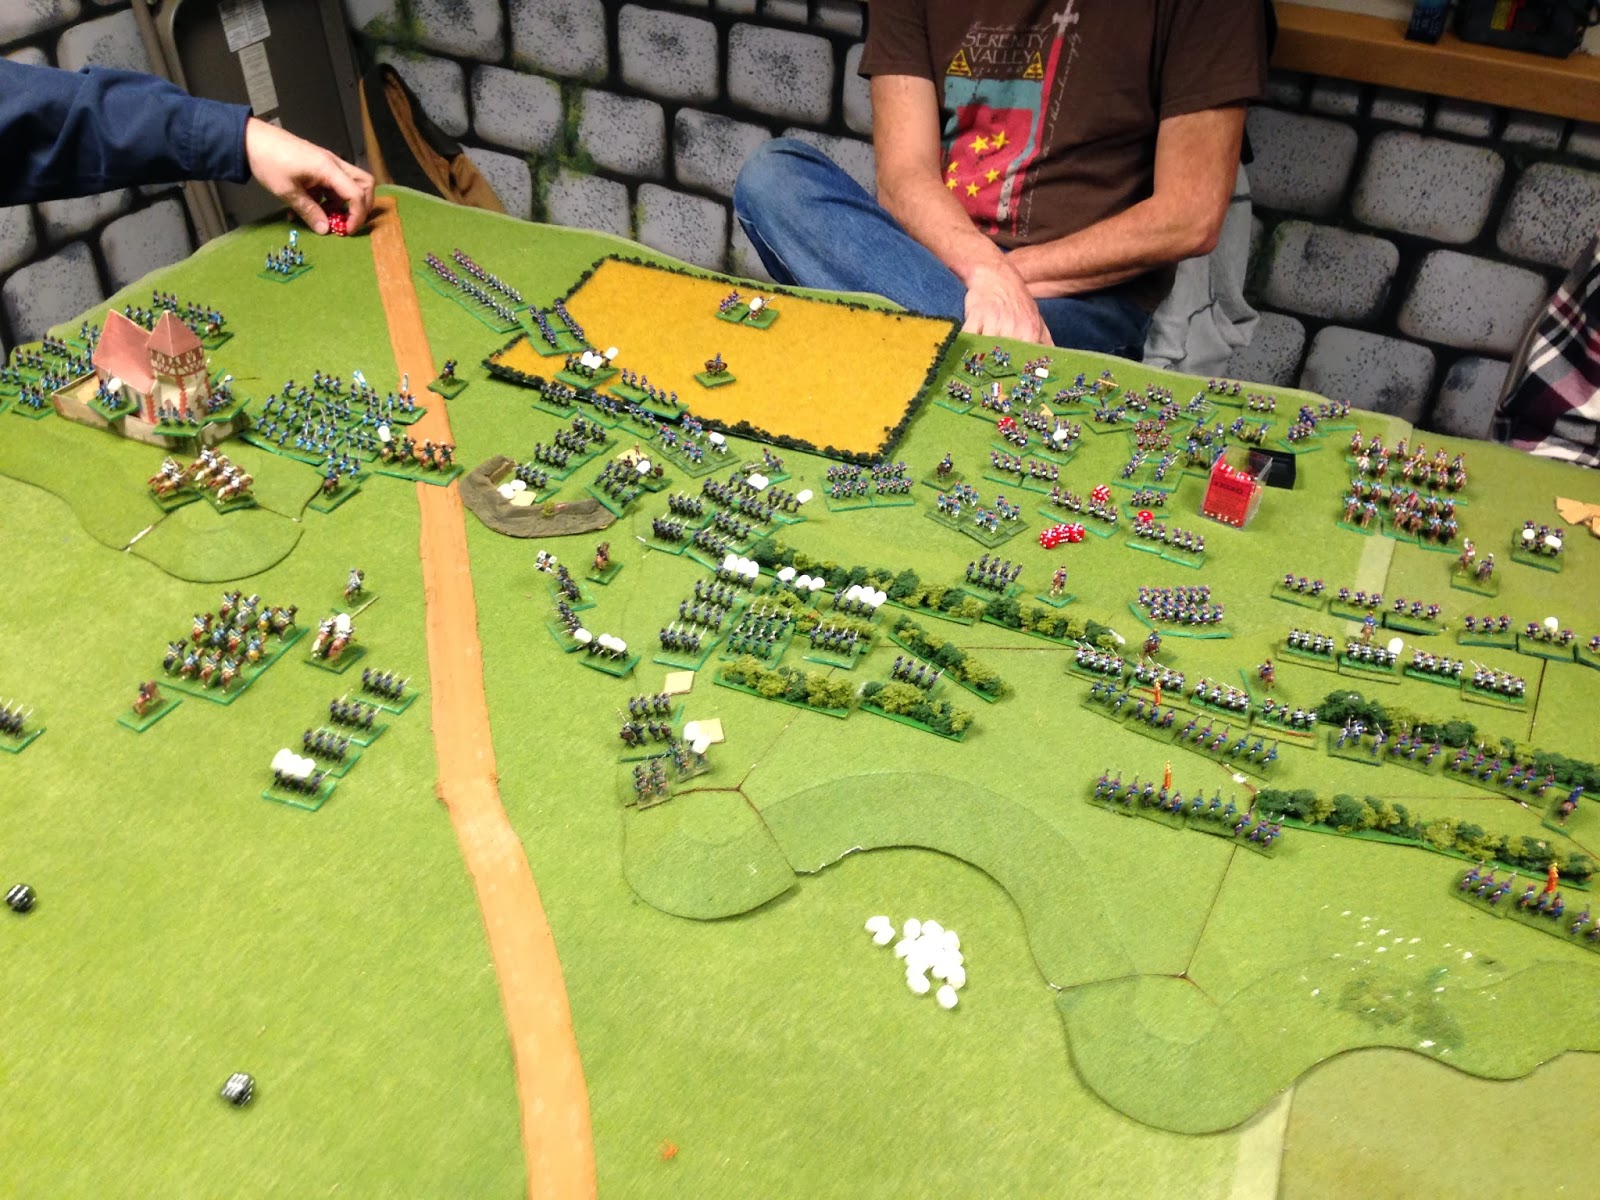
This past weekend our group ran a Franco-Prussian War game.  It was a hypothetical battle in the early part of the war.  The French held the high ground and were defending.  The Prussians had to force the French to retreat.  The rules used for this game were "They Died for Glory."

We've used this set before and Kevin has been using them for years. We like them because they provide a quick, bloody game.  We were able to finish our game in 3 hours and had a very decisive outcome.

Here are some pictures from the game.

This was my division of Prussians for the game.

My friend James (his arm and soda) setting up his division of Prussians.

Kevin ran the game and controlled a portion of the French.

Anthony (well his arm and body) controlled the French opposite me and developed and defense in depth against me.

The French bloodied my Prussians as they closed with the small village and woods.

My Prussians crested the hill and started to force the French back in the center.

My Prussians hit the village and stall from the rugged French defense.

Another Prussian division (Andy arrived late) arrived a few turns in and got held up behind James' troops.

James' Prussians close on the monastery and gain a foothold.

James' troops also push the center of the French back.

Some of my troops seeing some hand to hand combat with the French in a vineyard. 

The town continues to hold up my troops.

At this point Kevin called the game as both Andy's fresh division and James' division collapsed Kevin's French line

I made little headway against Anthony's troops holding the village.  While I did well against his troops in the center of the battlefield, I was unable to press the advantage.  I did however tie up his troops so he couldn't help Kevin.

Overall we had a great night of gaming.

Saturday, December 21, 2013

Merry Christmas, Happy Holidays and Happy New Year!!!!

It's hard to believe that it is the end of the year already.  My daughter is out of school for her Christmas break, the tree is up and decorated. There are colored lights on the outside of our new home for the first time. Our bank account is dwindling with the buying of presents for family and friends.  So, Yes, it must be the end of the year. :-)

The move went smoothly into our new home.  The unpacking process has been slow but I have been able to find arrange most of my gaming supplies etc into one place and put some of it away. I did manage to run two games in November but I couldn't find my camera and was so involved with directing the games, I didn't take pictures with my phone at all.  Bad Game Master!
Tonight however, I will be able to play while one of the other guys runs a Bolt Action game.  We haven't tried the rule set yet so this will be a first for us.

I've been thinking about the coming year and how I want to approach it in hobby terms.

My 10mm AWI project.  I have collected all of the figures I need to get started. What I don't have desire to do is paint it all.  This might be a project I send out to DJD and have them do it for me.  Simple rationalization here is, if I want to use this year someone else has to paint them.

Terrain:  I have been toying with the idea of making more terrain boards, but I need to be able to store them and pack them securely so I can take them to the game store on game nights.  Haven't worked that out yet.  From my first set of boards, I have learned a lot from others out there on the web and from what I didn't like with my first ones.  The other option is to buy up some more of the GHQ terrain maker product and build up a sizable stash of those, but they aren't cheap, in the long run, and will take lots of time to make them up.  The last option is to get Kallistra's Hexon product. They are preflocked and it would take two boxes to fill a 6'x4' table.  The draw back here is they are expensive and they would have to ship from the UK.  I do have some of their hills which are rather nice and durable to regular gaming.
I am still on the fence about this and I don't want to make a hasty decision because whatever I invest in will have to work the first time for a long time.
Along with the terrain boards, I want to redo all of the Woods pieces I build a few years ago.
They are starting to show their wear from constant use and I'm finding that I want the forests/woods to have more depth to them.  Since most rules call for some sort of depth that a unit/figure can see into or fire through are a constant theme, it's time to widen the woods.  Again, after seeing what others have done I have a good idea as to how I want to do these.
Buildings and other assorted terrain features will be done too this year.  I have several houses for the AWI project that need some paint.

Other Figure Projects: I have several other projects that I have working that I would like to complete this year.  The first is my Arab/Israeli figures for 1967. This will be a skirmish level game for us.  I have armor and figures for the Israelis and armor for the Arabs but need figures for them.  Since this is somewhat small in scope I'm hoping to have this done quickly.
I have started to collect figures in 10mm for Rome vs. Carthage era gaming I want to do.  Most likely these wont see any paint or time on the table until the end of the year.
The last project is getting together some 1/600 scale jets for Check Your 6: Jet Age.  I have picked up some to do some Arab/Israeli fights but have yet to put paint onto the planes.  The other thing I want to do with this is have better bases, that allow the plane to show if it is in a bank, climb, dive etc.. attitude while playing.

Over all I think that is the plan for 2014.  I'm sure somewhere along the line I will see something that will catch my interest and totally derail what I've written here. :-)

I would like to thank everyone who has come out to this little corner of the internet and has read what I've written and has helped with some of the decisions I've made.  I hope to be a little more active on the blog in 2014 than I was in 2013.

Happy Holidays from Oregon! May you all stay safe and prosperous in the coming new year! 


Saturday, October 26, 2013

Moving is the real barometer of how much stuff you have.

Well the new house is at the underwriting stage and so far all of the hoops have been cleared to this point.  Hoping that the next week goes smoothly and the movers arrive on time on 11/4.

This move has certainly put into perspective how much modeling, miniature and gaming stuff I have collected over the last 4 years or so.  Yesterday I spent the entire day just packing up all of my stuff.  15 boxes later, and mind you I haven't even touched the miniatures yet, my little corner of our shared craft room is cleaned out.  I'm pretty sure the miniatures will be another 4 boxes.

My wife and I have been debating on how we want to setup the new craft room for the two of us.  It's a little larger and has more open wall space.  There's no closet in the bonus room, so shelving of some sort will need to be used.  Ikea has some interesting layouts and will mostly be used for the room.  I would almost like to store my miniatures so they can be viewed.  I was thinking of a glass case to put them in but not sure if that's the best way to do it.  Any suggestions?

Hopefully I will be back to posting a little more regularly after the move is completed. I also have to get my painting mojo back and get started on my 10mm AWI armies I have.