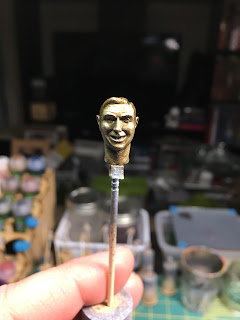
Surfing the interwebs the other night I came across a video of a person painting a portrait with one color. That person used Raw Umber and as I watched them draw out the shape and add detail to the canvas like shadows, high lights, eyes, light and dark strands of hair, I thought to myself "I've got to try that!" I am by no means anyone with any sort of artistic talent and I can't draw a straight line with a ruler. What the hell, I'll give it a go!
So I grabbed one of my recently primed 1/16 scale Verlinden heads I had purchased and had primed using black and white.
I put a little bit of Raw Umber on my palette and thinned down a little bit of it so it was translucent (high light) and thinned out a smaller area for the mid tone and then left some a little thicker for the shadow areas.
Here's how it turned out. It was a nice attempt at picking out high lights and shadows and deciding where those would go and seeing how the under color of the primer adjusted what I was doing. Next time I try this I will prime the figure in all white. I think it will work better for this technique. I certainly won't do this for a unit of figures but it was fun and only took me a 1/2 hour to do.
I'd be interested in what you think of this. Please leave me a comment below.
Welcome to my wargaming blog. Within these pages I will chronicle the exploits of our little Portland, Oregon wargaming group. Our interests flow from medieval to modern gaming. I hope you enjoy our little corner of this wonderful hobby.
Thursday, March 22, 2018
Saturday, March 17, 2018
Painting figures with the Zorn Limited Palette
In my attempts to increase my knowledge of color and color theory (remember I'm color blind) to get past the hurdle that I have and to decrease the number of paints I need to paint a figure/s, I've been looking at different artists and how they approached painting portraits. I rather happily came across Ander Zorn.
For those of you not familiar with him, Ander Zorn was a Swedish artist born in 1860 and died in 1920. He was Sweden's premier artist and painted portraits of the King of Sweden, Presidents William Taft and Grover Cleveland, among other notable people. He also painted landscapes. What is most interesting about Zorn is his palette. He only used 4 colors. They were Ivory Black, Vermillion, Yellow Ochre and Flake White. It is said that on occasions he would add or replace a color with Cerulean Blue at times.
Anyway with just the four above mentioned colors he turned out paintings like these:
For me this is amazing. Now mind you he is not the only one or the first to do this but his work stands out. I thought this would be a good place to start because there are only 4 colors to use and everything can be mixed with those four. Also this would give my eyes a chance to see the different shades and tints one can create.
So I mixed up a small Zorn palette using the before mentioned colors. Here they are:
Across the top are Ivory Black, Vermillion, Yellow Ochre and Flake White
From Left to right: Black mixed with Vermillion, Vermillion mixed with Yellow Ochre, Yellow Ochre mixed with Black, White mixed with Black and then Black mixed with White in a different ratio.
Next to each color is its tint which is the base color mixed with white.
The rest of the tint colors.
The three colors in the upper right are Red mixed with White, Yellow ochre mixed with White and Black mixed with white.
The combinations are almost endless. I only did a few to practice.
To continue practicing I decided to paint two 28mm figures. Both are from Foundry.
I forgot to take a before photo of the 1700s gentleman.
All of the colors on this figure's uniform was came from the Zorn palette. I will over the next few days go and add highlights and more shadows. I used a glazing technique so the oil paint will dry faster. So each layer of paint I put on will allow the previous layers to show through creating a deep rich color.
This is the other figure I did:
These photos are the before painting. I primed the figure with Black and allowed that to dry a little. I then went and sprayed White over the Black. Doing that allowed shadows and highlights to appear. There is a term for this type of priming but I forget what it is called.
Now the figure after I applied its first glaze of colors. I still have to go back and paint the hair.
I hope you liked this post. Once I get some more glazes done on both figures I will put up another post about their progress.
Until then stay well.
Tuesday, March 6, 2018
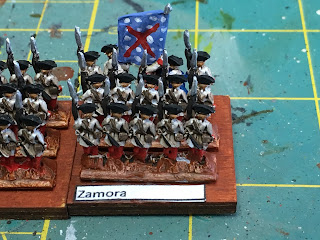
The Spanish Battalion Zamora arrives!!
After a week of being sick and then a cold snap prevented me from painting and priming any figures. I was able to get this one unit done. The Spanish Battalion Zamora has arrived! As with all of the Spanish units for the Battle of Almanza the flags are speculative.
Friday, March 2, 2018
Miniart 1/16 Musketeer Part III: The underpainting
So I finished, finally, filling all of the gaps and allowing it to dry and sanding down the putty. I ended up being sick all of last week so I didn't do any painting. Did not feel up to it. This week I was able to prime the figure using black and overlaying that with white.
The overlay of white over the black picks out the highlights and the black is left as a shade or shadow.
Once that dried completely I then created my underpainting. This is a mixture of watercolor paints and elmers/white glue. The colors used are artist quality watercolors and they are Ivory Black, Red Ochre, Brown Ochre, Yellow Ochre and Chinese White. I create a mixture of black, red and brown ochre and white. I add the glue and then lots of water to create a wash.
I then take my Size 6 brush and paint upwards allowing the paint to pool into recesses and stain the primer.
Once that starts to dry I then mix Yellow ochre, Brown ochre and glue. I add water to create a wash and then I paint this onto the areas of flesh that will become the high light areas. So the bridge of the nose, cheeks, chin, forehead, fingers and so on.
I will allow all of this to dry for 24 hours. As the glue dries it will suck the paint into the recesses and when I apply oil paints as a glaze the pigments will show through and add depth to the paint/figure just like a traditional oil painting.
Subscribe to:
Comments (Atom)


